
Learning how to measure amps with a multimeter is reasonably uncomplicated, as this device is a cinch to use. This guide will help you accurately and correctly test amps with a digital multimeter, whether you’re using a basic model or a more advanced one with extra features and accessories.
The important thing is you know which settings to choose and the best steps to take when using multimeter check amps.
Table of Contents
Step-by-step Instructions to Use a Multimeter to Measure Amps
1. Prepare the following
- Multimeter
- Gloves
2. Verify the ratings you’re working with.
As often as possible, I don’t skip these safety steps before proceeding to measure battery amps:
- Are you sure of your multimeter’s maximum amp rating? It’s usually printed on the back of the multimeter. If you can’t find it, consult the manual or the website of the store you purchased it from.
- Is your power source rated for 10A or 20A or less? Look at the device or gadget’s nameplate to confirm. If you’re checking a car’s battery, look up the specification termed Cold Cranking Amps (CCA, in short).
3. Check the fuses.
Before starting, never forget to check whether the multimeter’s fuses are still in working condition. To do this, insert the red lead into either the amp (A) or microamp (mA) terminal, depending on which fuse you want to examine.
Afterward, turn the multimeter’s dial to any position other than the one with the amps symbol. The device should emit a beeping sound and display the words “LEAD” – at least, that should happen if you’re checking amperage with a Fluke multimeter.
That means it’s good to go. If there’s no beep, the fuses are likely no longer working and the meter has to be repaired.
With a Klein multimeter, the LEAD sign should be displayed if the fuses are blown or if you’ve inserted the lead incorrectly relative to where the dial is currently positioned.
4. Insert the red lead into the amp (A) terminal and the black lead into the ground (COM) terminal.
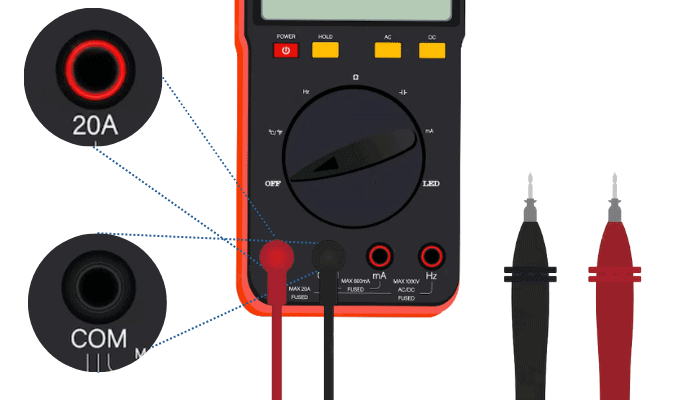
I recommend always using the amp (A) terminal first when getting an amp reading, especially if you’re unsure whether the source has a high or low current.
Why? Because settling for the lower microamp (mA) terminal from the start raises the risk of blowing its fuse, which is only rated for that lower amperage.
If you want to measure the current draw of an appliance that you are confident has a low current rating, then you can insert the lead in the milliamp terminal instead.
With that done, you can now grab the black lead and plug it into the ground (COM) terminal. Afterward, rotate the dial or knob until it’s set to the A or milliamp position.
5. Set the meter to AC or DC.
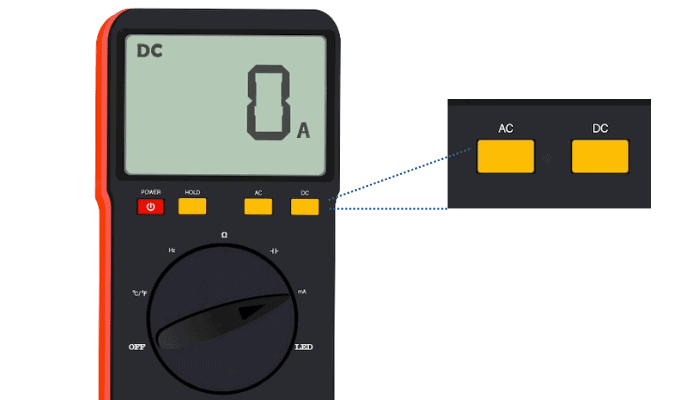
Turning the knob should automatically turn on the multimeter. Once it’s on, you need to set the meter to AC or DC, depending on what’s appropriate for the source you’re measuring.
For certain Fluke multimeters, you just have to push the yellow ‘Function’ button to switch between AC and DC.
On Klein devices, you may have to push the red ‘Select’ button if the setting (i.e. Volts, Amps, etc.) bears both the AC and DC symbols. Otherwise, you’ll need to get the amp setting on the multimeter to either the AC or DC position.
To quickly distinguish between the symbols on analog devices, always remember that the wave-like lines pertain to AC while a straight line denotes DC.
6. Connect your multimeter in series with the source, then get the reading.
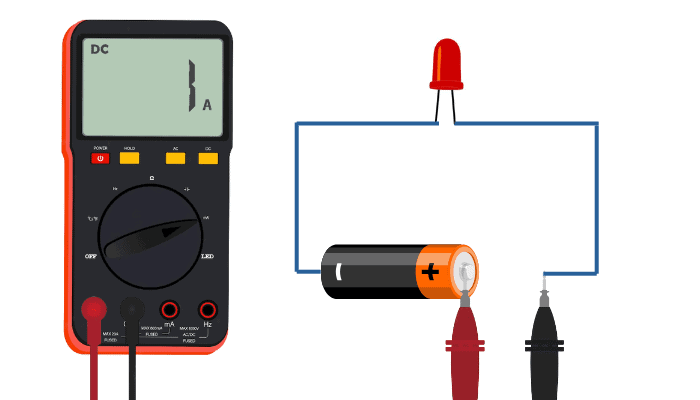
Whether you’re measuring the amperage of a simple circuit that you built from scratch or a component or gadget on 240v circuit, you have to connect the multimeter in series. This is the only way to ensure accurate amperage readings.
- To do this, you’ll have to create a break or disconnect at any available terminal post in a circuit, since current measurements stay the same throughout the electrical
- In some cases, you’ll have to unsolder or unhook the wires from one end of the component’s circuit.
Touch the red lead’s test probe to the terminal post (i.e. the point where you made the disconnect in the circuit), preferably a positive one. The black lead’s probe should connect to the wire that you disengaged to complete the circuit. Now, the multimeter is part of it!
Assuming you followed every step to a tee, the multimeter should automatically display the correct amperage figure. Once you remove the probe (i.e. open the circuit), the number should fall. Always take note of the figure that’s displayed as long as the probe is touching the power source.
For a more detailed guide on checking 240 voltage with a multimeter, don’t hesitate to click here!
A Few Important Notes

- These steps pertain to multimeters made by Klein and Fluke. However, they will certainly give you a good gist of how most multimeters work and should be operated.
- The maximum current that most multimeters can handle is 10A or 20A. Don’t attempt to exceed anything over that figure as doing so will blow a fuse and render the meter useless.
If you want to measure higher amperages, you’ll need to use clamp meters, which will need a different set of instructions.
Take note that some people may say you need to “determine amps with a clamp multimeter” when in reality, they’re actually referring to clamp meters. The point is: don’t be confused about the two.
- Is the circuit you’re measuring AC or DC? Most modern multimeters can measure both. However, some multimeters can measure AC but cannot measure DC amps.
Always verify this first, and be sure you’re using the correct multimeter for your purpose.
- Don’t confuse volt amps (volt-amperes) with current since the former is more related to watts than anything.
FAQs
Testing the cold cranking amps of a car battery
Let’s say you want to check whether the cold cranking amps displayed on your car’s battery’s label are correct or you’re testing the battery’s overall health. This is one good way of doing a multimeter car battery checkup.
I’ll use a standard 12V battery setup for these steps:
- Connect the red and black lead probes to the positive and negative terminal posts respectively. Then, set the multimeter dial to the DC voltage position.
- Start the car’s ignition, then leave the engine running. In all that time, the voltage reading shouldn’t go below 10. It’s fine if the value’s a bit higher.
- Assuming the reading doesn’t drop and stays stable, then the batteries in good condition. Otherwise, if it drops below 10V to, let’s say, 5V, then you may be dealing with a battery that warrants replacing.
A couple of tips worth taking note of
- It’s best to connect the leads to the ground side of the circuit every time to ensure you protect your gadgets and yourself
- Always check the multimeter, its slots, and probes for any obvious signs of damage. Never work with broken probes if you value your life!
- To connect the multimeter breadboard for measuring current: insert the black probe into the COM port and the red probe into the mA port. To measure, put the black probe to the negative and the red one to the positive.
What is the symbol of amps on a multimeter?
It’s represented by a capital “A”. On the other hand, the symbols “µA” and “mA” stand for microamps and milliamps, respectively.
How does DC amp differ from AC amp?
They both refer to how electrons flow. Direct current flows in a single direction, while alternating current flows backward and forward in multiple cycles.
How do you test amperage on a wire?
You can either use a clamp-on ammeter (i.e. clamp meter) or a multimeter.
The quickest way to do this is to use the clamp meter. Just set it to AC or DC, then set the measurement range (which ranges from 0 to 600A, and even up to 2500A, depending on the model you’re using).
Afterward, hook the meter onto any live wire part to start measuring.
Conclusion
Now that you know how to measure amps with a multimeter, the entire process is pretty straightforward, right?
- Before measuring, take note of your multimeter’s and load’s total current rating and whether it’s AC or DC.
- Check if the multimeter is properly working, especially its fuses.
- Insert the leads to the correct amperage terminals, set the dials to suitable positions, then set the meter to either AC or DC.
- Connect the multimeter in a series, then get the reading.
- When testing your car’s battery’s CCAs, make sure you connect the probes to the right terminal posts before firing up the ignition for accurate measurements.
If you are finding a guide about appliance checking with a multimeter, these articles are made for you:

I am Edwin Jones, in charge of designing content for Galvinpower. I aspire to use my experiences in marketing to create reliable and necessary information to help our readers. It has been fun to work with Andrew and apply his incredible knowledge to our content.