
Anyone with enough time and motivation can learn how to install a subpanel in garage.
Of course, you have to be familiar with your service panel’s layout and local Code regulations, how to safely use the necessary tools, and have clear goals in mind.
This article explains how to install a garage sub panel. It assumes you’re installing a 60 amp sub panel detached garage, but the steps apply to sub-panels with any rated current.
Since the garage’s detached, we included the usual steps on mounting and wiring plus trenching.
Table of Contents
- What to Prepare
- The Detailed Steps to Install a Detached Garage Subpanel
- Step 1: Verify your requirements
- Step 2: Determine the right wire and conduit size
- Step 3: Clear a path from the service panel’s conduit to outside the property
- Step 4: Install the grounding rods
- Step 5: Dig the trench for the entire run of the underground wires
- Step 6: Lay and connect the conduits and wires from your house to the garage, then mount the sub panel.
- Step 7: Pull the wires through the conduit
- Step 8: Wire the sub panel then check for voltage
- FAQs
- Conclusion
What to Prepare
- Subpanel kit
- Right-sized wires
- Conduits (with various necessary bends and elbows)
- Box connectors and couplings
- Straps and clips
- PVC solvent glue
- Electrical tape
- Trenching spade or rental trencher
- Drilling tools
- Screwdriver
- Multimeter
- PPEs (e.g. rubber insulated gloves, safety goggles)
- Concrete saw (optional)
- Sledgehammer (optional)
- Wiring diagram
The Detailed Steps to Install a Detached Garage Subpanel
Step 1: Verify your requirements
Every setup is different, after all. At best, you should have solid answers to the following questions before you start drilling the holes and trenching for your garage electrical panel:
- How much voltage and current requirements do you need?
- Are you aware of every sub panel in garage Code guideline in your area?
- Will you need to cut concrete or require heavy-duty tools for drilling holes?
- To account for possible voltage drop, how long is the cable used to run electric to garage?
- Where are the available entry points for the service panel’s wires and conduits?
These are the most relevant NEC requirements that you need to be mindful of when installing a sub-panel in a garage that’s some distance away from the main panel:
- The electrical code requires outdoor wiring with less than 30 volts to be buried at least 6 inches deep.
- Conduit-free UF runs need to be buried at least 24 inches deep.
- Wires in PVC conduits and wiring runs that start from underground to the surface need to be buried 18 inches deep at the minimum. The latter needs to be in a conduit, too.
- All sub panels outside the structure housing the service panel need two ground rod They need to be more than 6 feet apart and bonded together with the appropriate-sized conductor.
- If you need to use conduits, you have to be familiar with NEC guidelines about them, particularly how to properly support them, and the maximum distances when fastening panels.
Step 2: Determine the right wire and conduit size
You’ll likely need to use a THHN wire since it’s water-resistant, versatile, and is most recommended in setups that need conduits. Know the size and number you need by following the correct charts.
- Let’s assume you’re installing 100 amp sub panel that’s a little more than 100 feet away from the main panel. It’s best to use a 3 AWG copper or 1 AWG aluminum and a 1 ½ inch conduit for it (or even a bit larger to make wire pulling easy). With a single-phase, you’ll need at least 3 wires.
- For a 60 amp sub panel, I recommend using at least a 4 AWG copper wire with at least a 1-inch conduit that can fit 4 wires.
Keep in mind these facts and tips when determining the correct wire and conduit to use:
- Aluminum costs less than copper and is generally more lightweight as well.
- Adjust the conduit size by at least one, if not more; trade size to account for the distance and possible future expansion.
- Voltage drop generally becomes a major factor if the wiring run exceeds 100 feet.
- Anticipate exposed areas by using more durable and corrosion-resistant conduits like IMC galvanized and rigid metal varieties.
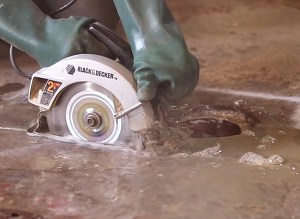
Step 3: Clear a path from the service panel’s conduit to outside the property
You’ll have to turn off the main breaker before beginning any work on the panel. Look for the best areas of penetration in the wall and the panel’s available knockouts.
- Having a handful of drilling tools on hand can come in handy, especially if you need to enlarge holes and deal with tricky entry points and angles and extra-thick walls.
- The same goes for having different types of conduit fittings you need. They will ensure optimal connections based on your setup.
Obviously, I can’t recommend a specific tip since every panel’s its own thing, and you know your property’s layout best.
Step 4: Install the grounding rods
You can’t skip this step, especially if you’re installing in a detached garage and haven’t got the grounding rods for your sub panel in place yet.
Due to the technicality involved, I highly recommend you leave this to the professionals. This way, you won’t have to worry about any local grounding guidelines you may overlook.
Worse still is you may end up putting your and your loved ones’ safety and lives on the line just because you installed a ground rod and grounded the sub panel incorrectly – when a trained electrician can do this task with relative ease.
Don’t fall for the demonstrations you see on YouTube, since plenty of them tend to violate a Code rule or two. Doing this also spares you from unneeded anxiety and frustration come inspection time.
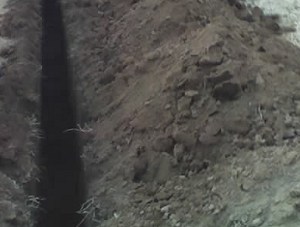
Step 5: Dig the trench for the entire run of the underground wires
- Note
If you’re not looking to run power to a detached garage, then you can skip this step and proceed to step 6, which starts the actual electrical sub panel installation.
After all, you can always add a 60 amp subpanel in the garage that also contains the main panel, which means no trenching is necessary.
If a trench is required, you’ll have to get a permit for it. An inspector will also drop by to make sure your intended run won’t hit existing pipes and wires.
Once you’ve ticked all those requirements, you can now start trenching. Expect this to be the most laborious step in this entire process.
Obviously, every project and soil condition are different, so I can only provide you with a couple of best practices when doing trenching:
- Rely on markers like flags to have a consistent reference of the areas you need to dig.
- Use a tape measure to ensure that you dig a depth of at least 18 inches from the top of the soil.
- Another time-saving tip is to just measure and match the correct depth with the equivalent spot on your shove
- Consider using a trenching spade because it tends to move dirt less and is designed for this specific purpose. It saves me tons of time and effort.
- The most convenient option is to use a trencher that makes short work of even rocky soils.
- Don’t leave your conduit exposed to the sun for long, since it tends to expand if you do so.
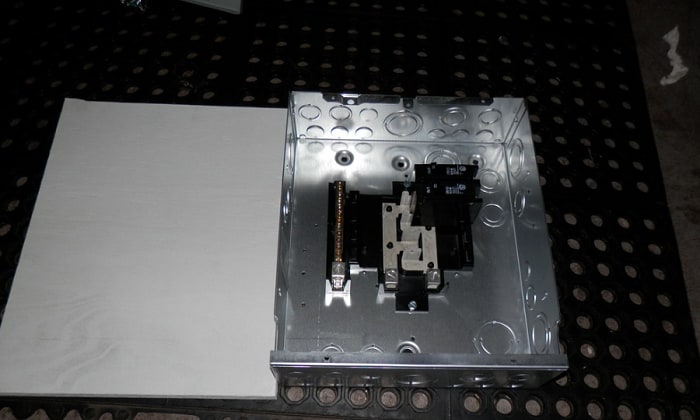
Step 6: Lay and connect the conduits and wires from your house to the garage, then mount the sub panel.
When connecting conduits, it’s always best to ensure that they’re rigid and tight at the joints, since those are the most fragile spots. There should be minimal to zero movements in the junctions.
- Use the right clips and straps when fastening to walls.
- When gluing, glue both the socket and the hub for an easier fit, then give it a nice twist to smear it around for even distribution. Continue doing this for every joint until you complete the whole run to the garage and the exact mounting spot for the sub panel.
- You don’t need to use glue on some conduit parts and couplings, especially if they’re compatible. They should slide right in snugly every time.
As for mounting the sub panel, you may not need to mount it with plywood backing on a masonry wall. Take note that some panels come with stand-offs that create an air gap; this gap will prevent corrosion.
Use the stand-off holes to mark the spots for drilling on the wall before creating the holes for mounting with your drilling tool. Once that’s done, position the sub panel correctly then screw it in place.
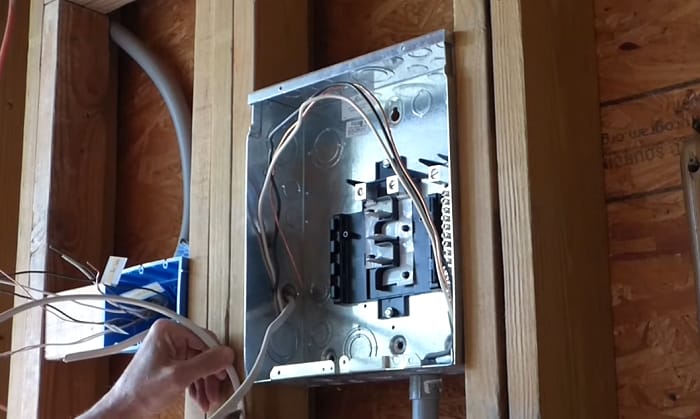
Step 7: Pull the wires through the conduit
Usually, you’ll have four wires to work with: 2 hots, 1 neutral, and 1 ground.
To make pulling the wires through the pipes as easy as possible, I recommend bundling the front end as tightly as possible using electric tape. Electric tape provides that much-needed tension that other tapes can’t, so don’t settle for anything less.
Once that’s done, just slide the front end into the conduit entrance, and let another person do the pulling on the other end.
You can use a wire pulling lubricant if there’s significant resistance and prevent your wires from kinking up. If you choose to oversize your conduit a bit, you may not encounter strong resistance while pulling.
Pull just enough wires to reach the sub panel and terminate them properly there.
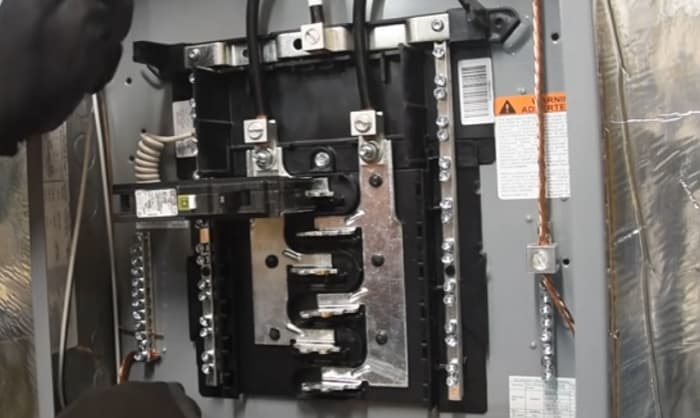
Step 8: Wire the sub panel then check for voltage
Logically, there are bars or terminals intended for hot, neutral, and ground wires. It’s always black and red wires to the hot bar, white to the neutral bar, and green to the ground bar. You’ll only need to strip the cables and then connect them to their intended terminals.
- Don’t forget: grounds and neutrals need to be separated on the subpanel!
- Use a screwdriver to screw the wires in place. Follow your panel’s exact torque settings. These are usually found on one side of your panel.
Head over to the main service panel to wire the other end to a circuit breaker there. The sub panel doesn’t have its own protection, after all.
Most panel kits come with a breaker, so feel free to use that. Just make sure it’s compatible with the main panel.
Strip then connects the hot, black wire to the circuit breaker by screwing it in tightly into the terminal lugs. Then, restore the power and turn on the breaker.
Lastly, verify whether there’s power on the subpanel by checking its voltage with a multimeter. Now, you’re done adding a subpanel to a detached garage.
FAQs
What are the benefits of a detached garage subpanel?
- You get more circuits, which is especially helpful if you’re expanding and your main breaker panel can’t accommodate them.
- You’ll be able to address voltage drop problems when running circuits that are a bit far from your home.
- Lessen the burden on your main service panel.
What kind of amps does a detached garage subpanel need?
Most people who intend to use high-draw tools choose a 100 amp panel. However, if you’re just going to use the sub-panel for lighting the garage or for low-draw appliances like ovens, then a 60 amp one should suffice.
How much does it cost to install sub panel in garage?
Most projects cost between $1200 to a little below $1,500. The cost to install grounding rods varies a lot per state. On average, it’s around $200.
You’re basically paying the most for the labor involved. This is precisely why people attest to saving plenty of money by going the DIY route.
For more the detailed cost, please take a look at this article
Does a sub panel in a garage need a main breaker?
No, since it’s already connected to a breaker on the main service panel. The service panel already provides the needed protection for it.
Conclusion
To sum up this guide on how to install a subpanel in garage, keep these steps in mind:
- Step 1: Plan your setup and review every requirement, especially local Code laws and the correct wires and conduits to use for your chosen sub panel.
- Step 2: Get the necessary permits.
- Step 3: Clear a path for the conduit then begin trenching.
- Step 4: Correctly lay the conduits and pull the wires.
- Step 5: Terminate the wires at the right bus bars, then hook them to a breaker at the main panel.
- Step 6: Check your complete work with a multimeter.

I am Edwin Jones, in charge of designing content for Galvinpower. I aspire to use my experiences in marketing to create reliable and necessary information to help our readers. It has been fun to work with Andrew and apply his incredible knowledge to our content.